How to Verify Email Address Before Sending Cold Emails?

No one loves email bounce backs, primarily when SDRs conduct cold email campaigns. According to a recent report by Constant Contact, the average email bounce rate is 7.75%.
But the good email bounce rate is less than 2%. Anything above 2% is considered critical.
Email verification techniques can be used to reduce your email bounce backs. It cleans your email list by filtering the spammy and invalid addresses that help you in proceeding towards your email campaign securely. But many email professionals are unaware of how to verify email addresses.
This article will help them with multiple email verification processes, and it’s best practices to improve email deliverability in a considerable amount.
Table of Contents
- Why should we verify email addresses?
- How to verify email address before sending cold emails?
- How frequently should you validate your email list?
- What’s next? Cold email campaign
Why should we verify email addresses?
Before jumping into the steps to verify the email addresses, let’s go through the quick benefits of email verification. This will help you understand the advantages of email verifications and its consequences.
1. Stay away from bounces
As discussed, email bounces are the biggest nightmares of a cold email campaign. Continous bounce back degrades your email account’s authenticity and domain quality. Your email account might get listed in the spam index of various email service providers (ESP) and end up by getting blocked.
If you verify your email list before sending a cold email, you can easily segregate your good contacts from the bad ones. Ultimately it will decrease your email bounce rate and make you stay away from spam indexes.
2. Better sender reputation score and email deliverability
Every email account has a sender reputation score that helps the recipient’s ESP to decide the quality of the email. The higher the score, the better is the email deliverability and vice versa.
If you send emails to invalid or spammy email accounts frequently, it can lead to suspension of your email account.
Verifying your email account helps you in getting your emails to the right recipient in an authentic manner. This will keep your email account healthy and increase your reputation score.
3. Getting better results from your email campaign
You import a list of recipients for scheduling an email campaign. With large lists, the chances of email bounce also increase. This eventually affects your whole email campaign performance.
Also, you spend a lot of time and energy on an email campaign, which might go to vain if it doesn’t provide you with the desired results.
Email account verification excludes the bad contacts from your lists, which increases your email deliverability. You also receive a higher open rate and reply rate that boosts your email campaigning performance.
To grab all the above benefits, you need to know the best email verification practices that can help you in landing your emails directly in your recipient’s mailbox.
Below we are listing 7 best tactics to verify your email addresses for getting the best results.
How to verify an email address before sending cold emails?
There are multiple techniques to verify email addresses. Some of them require advanced knowledge of email technology. However, in this section, we have added some easy techniques to verify your email accounts. We have also tried to provide simplified solutions to tackle the technical difficulties associated with it.
1. Check the email syntax
Typographical and syntax errors are one of the most usual issues with email addresses. They can be manually checked and modified. The standard email address follows the format of xyz@abc.com. It has three mandatory parts (unique identifier, @, and domain name).
The xyz in the email address is considered as the unique identifier of the email. It can be a maximum of 64 characters long and can consist of:
- Uppercase and lowercase letters in English (A-Z, a-z)
- Digits from 0 to 9
- Special characters such as ! # $ % & ‘ * + – / = ? ^ _ ` { |
The @abc in the syntax example is the domain name. This is usually the same as the business domain, like @saleshandy.com or email service providers like @gmail.com.
You need to check your recipient’s email address must follow the required syntax. Any other format other than this syntax is faulty and is more likely to bounce back. Also, check the typographical mistakes like @gmal.com or @yahooo.co, leading to the bouncing back of your emails.
2. Ping the server
Pinging the server is a technical method to verify email address without sending emails. You need a tool like PuTTY for Telnet in Windows system to perform this check. If you are using a Mac system, you can use the iTerm app.
Follow the below steps to check to ping the email server.
- Enable Telnet in windows.
- Open command prompt, type the nslookup command: nslookup –type=mx domain.com
- You will find multiple MX records associated with the domain. Pick the one with the lowest preference number.
- Connect to the telnet server with the command: telnet {mail server address} 25
- Handshake with the server by typing: HELO
- Next, provide your identity with a random email address: mail from: {random email address}
- As the next step add the email address you want to verify: rcpt to: {email address to verify}
- The server will reply back with an OK or some error message. If the message is OK, then the email address is valid.
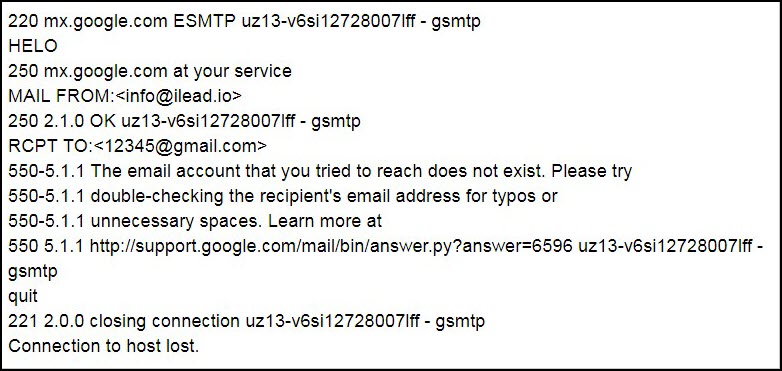
This method is accurate and provides the best results, but it’s very tedious and might affect your system negatively.
3. Send an email from a different account
You can verify the email deliverability to an email account by sending them an email, but doing that from your primary email account is risky. It is suggested to create a dummy email address and try out sending emails to your recipients. Further, you can clean up the bounced accounts from your email list manually.
Although this method works, it is quite tedious as of doing each work twice.
4. DNS lookup
DNS Lookup technique is used to check the authenticity of the domain. It also provides you with any blacklist or spammy data associated with the domain. To conduct a DNS lookup, follow the steps below:
- Open MXToolbox DNS Check in your browser
- Add the recipient’s domain name in the text box provided and click on DNS check
- You will get a list of hostname and details of the DNS records
- If you don’t see any details of the provided domain, the domain is most probably available.
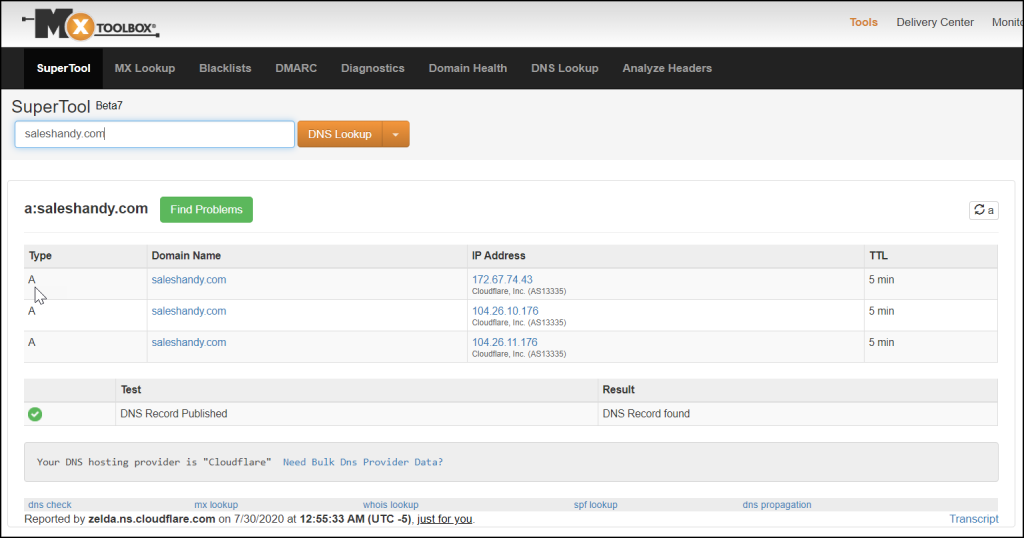
This test provides you the accuracy of the recipient’s domain but still can’t assure 100% deliverability.
5. Perform an IP address lookup
IP address lookup is another way to check the authenticity of the recipient’s email account. This lookup helps you by providing the IP details of the recipient’s email address. Follow the steps below to do an IP address lookup.
To start the IP address lookup, we need to find the IP address of the recipient as the first step.
- Open MX Toolbox in your browser
- Add your recipient’s email address in the text box and click on MX Lookup
- You will get a list of IP addresses associated with the email address. You can choose any one of them
In the next step, we will start with the IP address lookup. You can find many IP address lookup tools like whatismyipaddress over the internet that can provide the IP details of the recipient’s email server.

You can check with the location servers and ISP details provided in the results of the lookup. If you find anything unusual, then it’s a case of email spoofing and the email address is risky.
6. Use an email verification tool
An email verification tool can help you in doing all the technical verifications at one go. You just need to add the email list, and the automated system will verify all the email addresses for you. The other methods listed above are tedious, and each task has to be done individually. You can use a bulk email verifier tool to verify an email list and get results in a fraction of minute. This will help you in spending less time in email verification and providing your valuable time for cold email campaigns.
7. Verify your email list while sending cold emails
If you are planning to send a cold email campaign and hunting for a technique to verify your email list, then this section is for you. You can use SalesHandy to verify your bulk email list and send cold emails together.
Follow the simple steps below to verify and schedule a cold email campaign.
- Sign Up with SalesHandy and login to the web-app
- Click on email campaign from the right side menu followed by New Campaign button
- Upload your email list in a CSV format
- Soon, you will get a pop-up to verify your email list
- Click on Start to commence your email verification process
- It will take a few minutes and you can get your email list divided into 3 parts: Valid, Invalid, and Risky. It is suggested to proceed only with the Valid contacts for the best results. (Check the video below for better understanding)
- Scroll down to draft the email subject line and email body of your cold email. You can use merge tags to personalize your emails
- Add follow-up stages with your email according to 3 conditions: Not opened, Not replied and Regardless
- As the last step, select your desired time and date. Click on Schedule Campaign to send your email campaign to a verified email list.
Check the video below to get a detailed understanding of the SalesHandy email campaign process.
This technique is used by sales professionals, marketers, recruiters, and others to schedule their emails in an efficient manner and get the best results out of it. SalesHandy also uses the human-like sending methodology that maintains a high sender reputation score of your email account and provides improved email deliverability.
These processes can be used anytime to verify the email addresses, but doing it every time won’t provide any extra value to you. Read the article further to know when and how frequently you should validate your email list.
How frequently should you validate your email list?
Email list validation is an essential task for all the SDRs sending cold emails. But they need not have to do it every time. You need to check out for the following conditions when you need to go for an email validation check.
1. When you get a new list
If you are planning to send a cold email campaign to a brand new list, it is strongly recommended to verify it. The new list with a lot of data has chances of faulty, spammy, or invalid contact details, which can affect your email campaign performance. Upon verification, you can safely proceed towards sending emails. Once you verify the list, you won’t need to do it again before follow-ups or scheduling a new campaign with the same list.
2. A constant increase in your bounce rate
If you are using an email list for a long time and you find an increase in bounce rate in your campaign performance, its time to reverify it. Too many email bounce backs can affect your email account negatively. Before the situations arise, you need to verify the email address again and remove the invalid ones.
3. Periodic email list checking
It is suggested to go for a periodic email list verification, once in a quarter or half-yearly basis. There used to be a change in email addresses if any employee leaves an organization or any user deletes their email accounts. Periodic email verification helps you in cleaning up the trash from the old list. This will maintain your sender reputation and make sure your email campaigns get good results continuously.
What’s next? Cold email campaign
As we learned, email verification is an essential to-do before sending a cold email campaign. It stays you away from the various spams, email bounces, and provides efficient results.
Once you are ready with a healthy list, it time to start nurturing. Send your cold emails with SalesHandy with the best email deliverability practices and make them land in your recipient’s primary inbox.
We hope you got all your answers to how to verify your email address, and our solutions must have provided great value to you.
Please add your queries and feedbacks in the comment section below, and we will be happy to help you.
Source : https://www.saleshandy.com/blog/verify-email-address/


")

")